

Expanding your product offerings in WooCommerce is a breeze with variable products. These versatile items allow you to offer different variations of a single product, providing flexibility and choice to your customers. In this guide, we’ll walk you through the process of adding variable products step by step.
Step 1: Accessing Product Settings
Start by navigating to the “Products” section in your WordPress Admin dashboard. Once there, click on “Add New Product“ at the top of the page to begin adding your variable product.

Step 2: Enter Product Details
Enter the name of your product in the designated field. This should be a clear and descriptive name that accurately represents the product you’re adding.
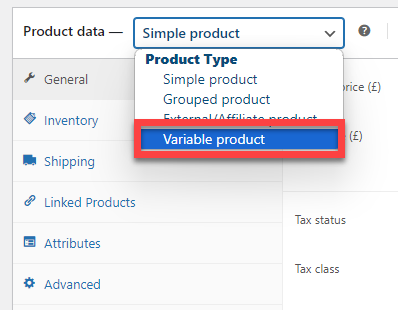
Step 3: Select Product Type
In the “Product data” dropdown menu, choose “Variable Product”. This indicates that the product you’re adding will have multiple variations.
Step 4: Adding Attributes
Navigate to the “Attributes” tab on the left-hand side under the “Product data” dropdown. Here, you have two options:
- Adding a Global Attribute: If you’ve already created global attributes, select the one you want to use from the “add existing” dropdown menu. Choose the variations/values you’d like to use from that attribute.
- Adding a New Attribute: Click the “Add New” button and enter a name for your attribute (e.g., size). Add the values (variations) you need, separated by “|” (e.g., Medium | Large | XL | XXL).
Click “Save Attributes” once you’re done.

Step 5: Creating Variations
Next, click on the “Variations” tab on the left. Here, you can either generate variations automatically or add them manually.
- Generate Variations: Click this option to add all possible variations from the attribute values/variations you’ve set.
- Add Manually: Choose this option to specify which variables will be available for the product. Click on each variation to expand its product menu and enter the necessary information such as price, stock status, weight, dimensions, and shipping class.
Step 6: Setting Product Information
Enter product information for each variation, including price, stock status, weight, dimensions, shipping class, and description. You can also use the “Bulk Actions” dropdown to set product information for all variations at once.
Step 7: Publishing Your Product
Once you’ve entered all the necessary information for your variable product, click “Save changes” at the bottom of the variations menu. Finally, click “Publish” in the top right corner of the screen to make your product live on your website.

By following these steps, you can easily add variable products to your WooCommerce store, offering your customers a wider range of choices and enhancing their shopping experience.