
")
Customizing your social media URLs can make a big difference because they make your profiles more discoverable. A couple of advantages to changing your URL are:
Give your relatives, friends, and family an exact URL to connect with you. Then you don’t need to tell people “search me up on Facebook” and let them play a guessing game of which profile is yours. While you can simply say, for instance, “my Facebook profile is facebook.com/myname,” and they’ll locate your profile on the first try.
Rank in the search engines for your name. When someone searches for your full name or company name in Google, your profile is more conceivable to arrive as a top result if its URL includes your full name or business name.
Change Your Social Media URLs
Change Your Profile URL (Username) on Facebook
Let’s begin with how to change your Facebook URL. To change your Facebook profile URL, all you need is to sign in to your Facebook account and click the tiny downward icon in the top right corner. Choose Settings & Privacy in the menu that appears.

Select Settings.

A General Account Settings window will open; click the “edit” beside “Username.

Now, enter the name you want to be your public Facebook profile URL and then click “save changes.

That’s all. The next time you visit your Facebook account, your URL displays as facebook.com/username.
How to Change Your Profile URL on LinkedIn
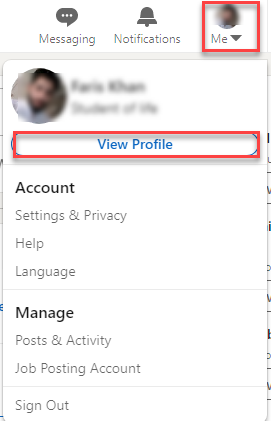
Changing your LinkedIn profile URL is quite simple; all you need is to sign in first to your LinkedIn account, select your profile image or the tiny arrow right below “Me.” Now, click the “View profile” from the menu that appears.
Next, select “Edit public profile & URL.”

Click the pencil icon beside your current URL under the “Edit your custom URL” section and enter the name you want to be your public LinkedIn URL and click “save” to save the changes.

Once you do so, your new LinkedIn profile URL will be www.linkedin.com/in/username.
How to Change Your Profile URL on Twitter
Changing your Twitter URL is relatively simple; all you require is to sign in to your Twitter account: once you log in to your Twitter account, click “More” in the sidebar on the left.

Select “Settings and Privacy” from the menu that appears.

Now, click “Account Information.”

Once you do so, Twitter will ask to confirm your password; after proving it, you will be shown a detailed “Account information” window, click “Username.”

Next, enter the name you want to be your public Twitter URL and click “save’ to save the changes.

You’re good to go now!
This blog post is powered by AIIT Solutions.