


In today’s dynamic work environment, efficiently managing leave requests is essential for both employees and organizations. How to apply for leave in HRMS is a vital process, and a Human Resource Management System makes this task seamless by allowing employees to apply for leave, track statuses, and check balances all in one place. This guide provides a detailed walkthrough of the steps involved in applying for leave in HRMS, ensuring your requests are accurate, well-documented, and efficiently processed.
Logging into HRMS
To begin, open the HRMS portal and log in using your unique credentials. Make sure you have your username and password handy. Logging in grants you access to your dashboard, where you can manage your leave requests and other personal details. Understanding how to apply for leave in HRMS starts with logging in, as it gives you access to the essential features for submitting and tracking your leave requests.
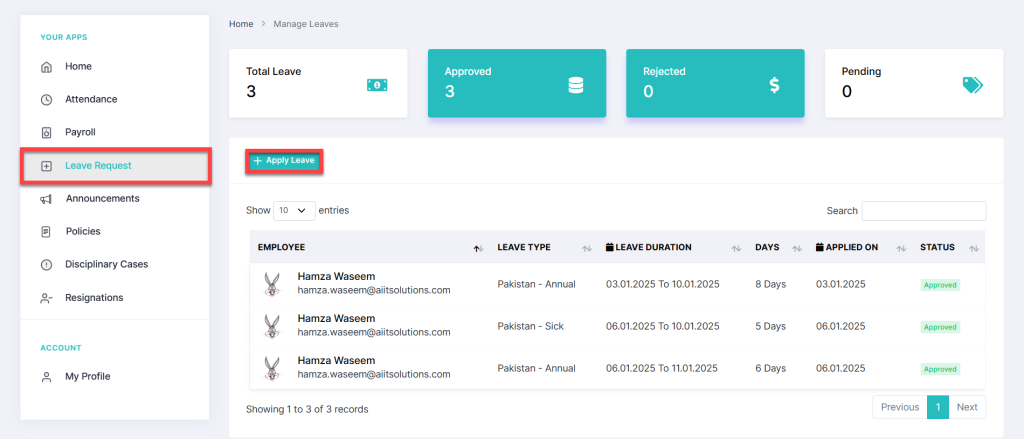
Accessing the “Leave Request” Section in HRMS
Once logged in, navigate to the “Leave Request” section in the menu. This is the central hub for all leave-related activities. Here, you can:
- Apply for different types of leave.
- Check your leave history and balance.
- Track the status of pending or approved leave requests.
Applying for Leave in HRMS
Follow these steps to apply for leave successfully:
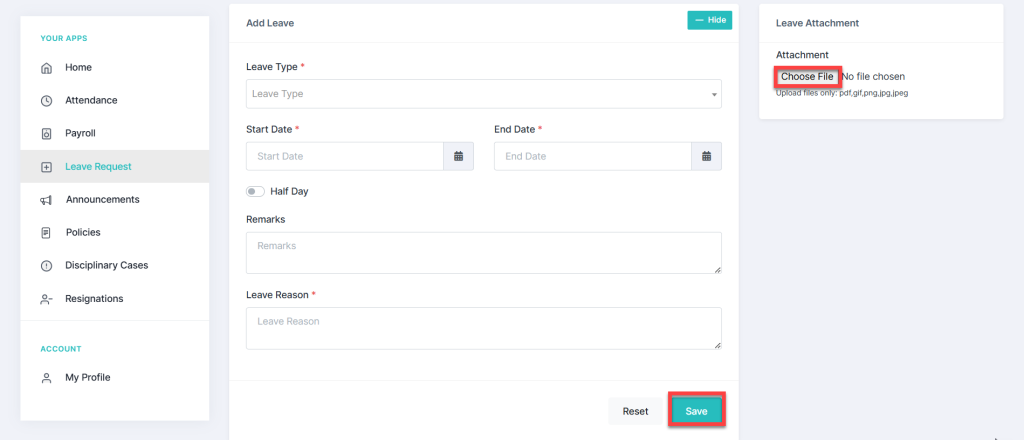
Click on “Apply Leave”
• Locate the “Apply Leave” button in the “Leave Request” section.
• Click it to open the leave application form.

Fill Out the Leave Form
To complete your leave application, provide the necessary details in the form. Begin by selecting the type of leave you’re requesting, such as Annual Leave, Sick Leave, Paternity Leave, Bereavement Leave, or Work from Home. Next, choose the start and end dates for your leave.
- Half-Day Leave: If you’re requesting a half-day, toggle the “Half Leave”
- Remarks (Optional): You may include additional notes or context if necessary.
- Reason (Compulsory): Provide a brief but clear reason for your leave in the designated field. This field is mandatory to complete the application process.
Attach Supporting Documents (if needed):
-
- For certain types of leave, such as Sick Leave, you may need to attach relevant documents (e.g., a doctor’s prescription or bed rest recommendation).
- On the right side of the leave form, you’ll find the “Leave Attachment” option.
- Click “Choose File” to upload the required document from your device.
Submit Your Request
- After completing the form, click the “Save” button to submit your request.
- A confirmation message will appear once your application is successfully submitted.

Checking Your Leave Status in HRMS
After submitting your leave request, you can monitor its progress through the HRMS dashboard
-
Scroll to the “Entries Details” section to view your request’s current status:
- Approved
- Rejected
- Pending
- View a summary of your total leave balance, pending requests, and rejected leaves at the top of the page.
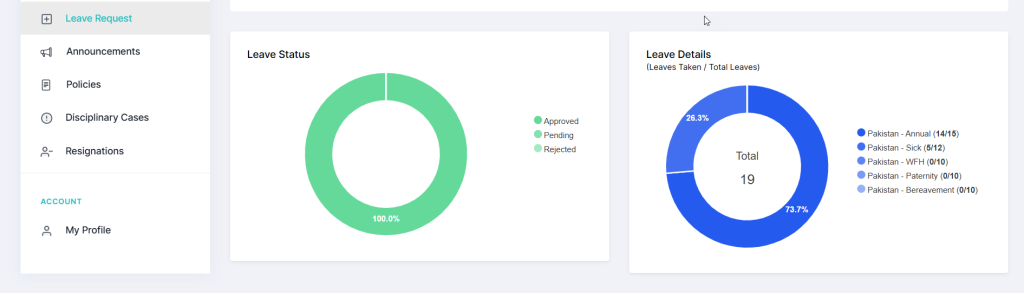
Viewing Leave Status and Graphical Details
HRMS provides visual insights to help you better understand your leave usage:
- At the bottom of the page, review graphical representations of your leave data, including:
- Status of leave requests (approved, rejected, pending).
- Total leave balance and a breakdown of leave types (Annual, Sick, Paternity, etc.).
- Use this information to plan future leave requests effectively.

Conclusion
Applying for leave in HRMS is a straightforward process that ensures your requests are well-organized and easy to track. By following these steps, you can efficiently manage your leave, check balances, and stay informed about the status of your applications.
Make it a habit to review your leave history and balances regularly to maintain transparency and avoid last-minute surprises. For any assistance, please contact us.


