


Managing employee records efficiently is crucial for any organization. A Human Resource Management System (HRMS) helps streamline this process, making it easy to store and update employee information. This guide will walk you through adding an employee in HRMS quickly and efficiently.
Log in to HRMS
- Open the HRMS website.
- Enter your username and password.
- Click the Login button to access your account.
Navigate to the Employees Section
- Once logged in, find the Employees tab in the main menu.
- Click on Employees to open the employee management section.
- Two sections will be displayed: Setup Employees and Setup Employees Exit.
- Select Setup Employees.
Adding a New Employee to HRMS
- Locate the Add New button in the Employees section.
- Click the button to open a new employee registration form.
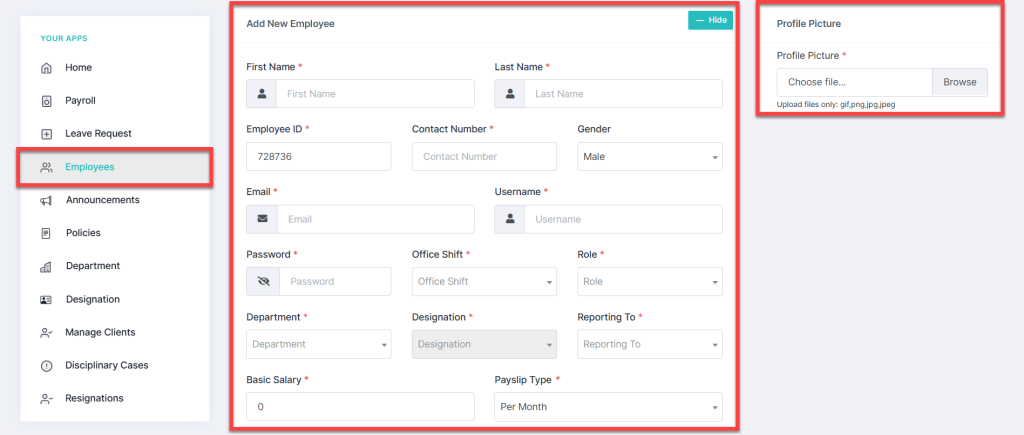
Fill in Employee Details
Basic Information
- First Name & Last Name – Enter the employee’s full name.
- Employee ID – Assign a unique identification number.
- Contact Number – Enter a valid phone number.
- Gender – Select from Male, Female, or Other.
- Email – Enter the employee’s work email address.
- Username & Password – Create login credentials for the HRMS.
Work Details of the Employee
- Office Shift – Choose the shift (Morning, Evening, or Night).
- Employee Role – Select the appropriate role (Admin, Employee, HR Director, etc.).
- Department & Designation – Assign the employee’s department and job title.
- Reporting To – Select the supervisor or manager.
Salary and Payroll Information in HRMS
- Basic Salary – Enter the employee’s salary.
- Payslip Type – Choose the payslip format.
- Country – Select the employee’s location.
- Contract Date & Joining Date – Choose the respective dates.
- Company Name – Select the company name.
- Currency – Choose the currency for salary payments.
Profile Picture
- Locate the Profile Picture section.
- Click Choose File to upload an image (Formats: gif, png, jpg, jpeg).
Save Employee Details
- Scroll down and click the Save button to store the information.
- Click Reset to clear the form and start over if necessary.

View and Manage Employees Details in HRMS
- The newly added employee will appear in the Employees List.
- View key details such as Name, Employee ID, Designation, Contact, Country, and Role.
- Use the Search Bar to find specific employees.
- Switch between Grid View and List View for different display options.
View and Edit Employee Details in HRMS
Locate the employee in the Entries List and click View Details to update information:


Contract Details
- View and update contract start and end dates.
- Modify department, designation, reporting manager, salary, and payslip type.
- Click Update Contract to apply changes.
Payroll Attributes
- View salary, bonuses, and deductions.
- Click Update to make adjustments.
Basic & Personal Information
- Update name, contact, gender, birthdate, marital status, address, and nationality.
- Add bio, experience, and social media profiles.
- Click Update to save changes.
Bank Account Details
- Account Title, Account Number, Bank Name, IBAN, Swift Code, and Branch.
- Click Update Bank Info to save.
Emergency Contact
- Enter Full Name, Contact Number, Email, and Address.
- Click Update Contact to store the details.
Profile Picture & Account Information
- Upload a new profile picture and click Update Picture.
- Change username or email address and click Save.
Uploading Employee Documents in HRMS
- Upload important documents like contracts, certifications, and IDs.
- Click Add Document to save files.
Change Password
- Enter the current password.
- Set and confirm a new password.
- Click Change Password to update.
Managing Employee Accessories in HRMS
- Record company-issued assets like laptops, monitors, and keyboards.
- Add notes if needed and click Update.


Conclusion
Following these steps ensures all employee details are properly recorded in HRMS. A well-maintained employee database improves efficiency, payroll management, and HR operations. Start adding employees today for a seamless HR experience! For further assistance, feel free to contact us.


